Windows Explorer lossis File Explorer tso cai rau koj tshawb cov ntaub ntawv thiab cov ntawv khaws cia hauv lub khoos phis tawj Windows. Yog li, koj yuav tsum siv Windows Explorer lossis File Explorer qhib lub computer nplaub tshev. Koj kuj tseem tuaj yeem siv Windows Tshawb nrhiav los tshawb nrhiav cov ntaub ntawv tshwj xeeb lossis Command Prompt yog tias koj xav siv kab hais kom ua.
Kauj ruam
Txoj Kev 1 ntawm 4: Qhib Cov Ntaub Ntawv Explorer
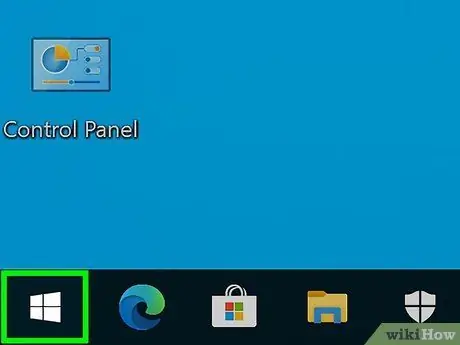
Kauj Ruam 1. Nyem rau Start button
Nws nyob rau sab qis-sab laug ntawm lub vijtsam thiab zoo li lub logo Windows.
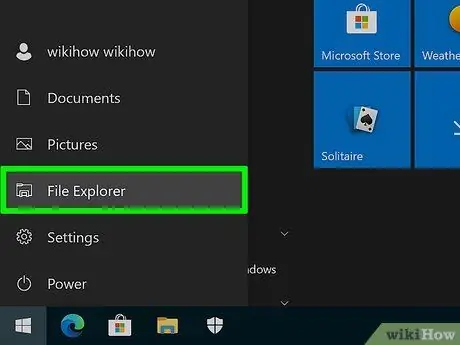
Kauj ruam 2. Nyem rau Computer icon lossis File Explorer icon
Yog tias koj siv Windows 10, File Explorer icon zoo li lub nplaub tshev thiab tuaj yeem pom ntawm sab laug ntawm Start menu lossis ntawm Windows taskbar nyob hauv qab ntawm qhov screen.
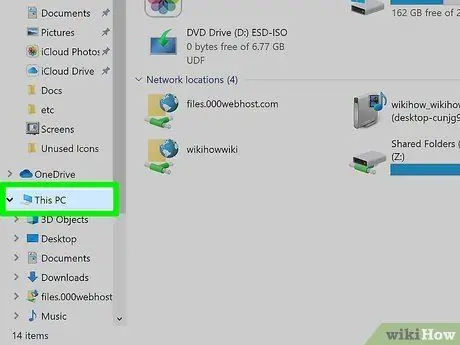
Kauj Ruam 3. Nyem Qhov Kev Xaiv PC no uas yog nyob rau sab laug ntawm File Explorer window (rau Window 10)
Qhov no yuav tso saib lub hard disk (hard disk), USB flash disk (USB drive), DVD-ROM drive (DVD-ROM drive), thiab lwm yam khoom siv (khoom siv) txuas nrog lub khoos phis tawj.
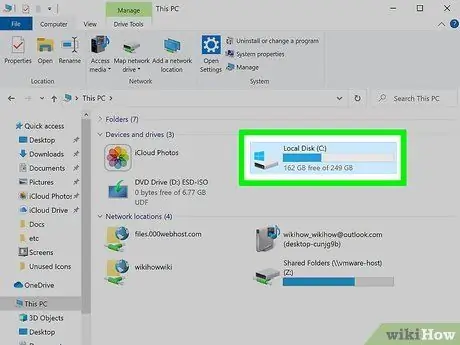
Kauj Ruam 4. Nrhiav lub hard disk
Thawj lub hard disk ntawm koj lub khoos phis tawj yuav tshwm nyob hauv ntu "Hard disk drives" lossis "Devices and drives" ntu. Lub hard disk muab faib uas muaj Windows cov ntaub ntawv ua haujlwm system yuav tso tawm lub Windows logo nyob rau ntawm nws lub cim. Feem ntau lub Windows operating system tau teeb tsa ntawm "C:" hard disk partition.
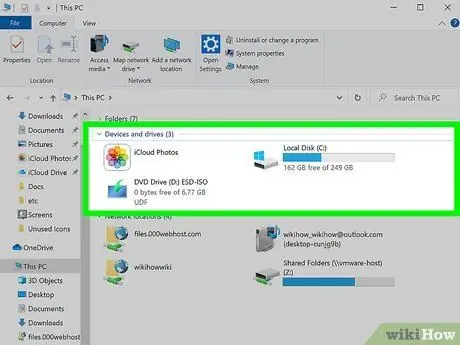
Kauj Ruam 5. Nrhiav koj lub hard disk thiab lwm yam khoom siv
Yog tias lub khoos phis tawj txuas nrog lwm lub hard drive, nws tseem yuav tshwm sim hauv ntu "Hard Disk Drives" lossis "Devices and drives" ntu. Yog tias USB flash drive lossis lwm yam cuab yeej txuas nrog koj lub khoos phis tawj, koj tuaj yeem pom nws nyob hauv "Cov Khoom Siv nrog Cov Khoom Siv Tshem Tawm" lossis "Cov cuab yeej thiab tsav".
Koj tseem tuaj yeem qhib lwm txoj kev xaiv uas zais hauv "Khoos phis tawj" lossis "PC no" ntu los ntawm txhaj khawm xub mus rau sab laug ntawm ntu ntawd. Tom qab ntawd, lub hard drive thiab lwm yam khoom siv txuas nrog lub khoos phis tawj yuav tshwm ntawm sab laug ntawm lub qhov rais
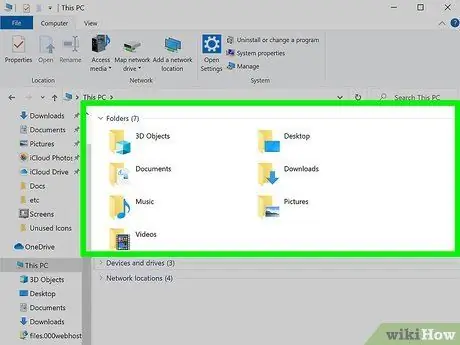
Kauj Ruam 6. Qhib koj tus neeg siv ntawv tais ceev tseg
Koj tus neeg siv cov ntawv yuav tshwm rau saum lub qhov rais hauv Windows 10 thiab Windows 8. Nws muaj Cov Ntawv, Cov Duab, Rub Tawm, thiab ntau daim nplaub tshev.
Yuav luag txhua cov ntaub ntawv thiab cov ntawv tais ceev tseg uas koj siv txhua hnub tuaj yeem pom hauv koj cov neeg siv khoom
Txoj Kev 2 ntawm 4: Xauj Cov Ntawv
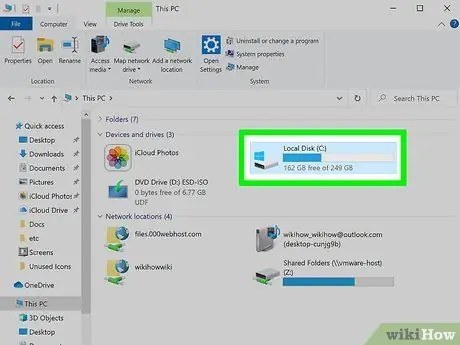
Kauj Ruam 1. Nyem ob npaug nyem qhov muab faib hard disk lossis daim nplaub tshev qhib nws
Koj tuaj yeem pom tag nrho cov ntsiab lus ntawm daim nplaub tshev hauv File Explorer window.
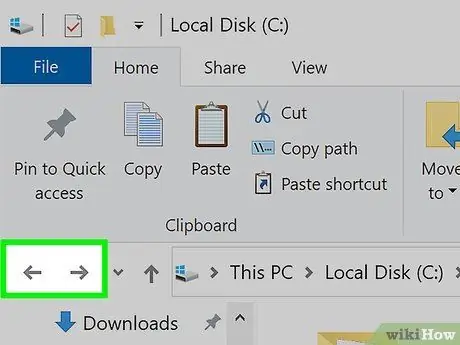
Kauj Ruam 2. Nyem rau Back and Forward xub khawm nyob rau sab saum toj ntawm File Explorer window
Cov "Rov Qab" cov yuam sij xub (xub xub tig rov qab) yuav coj koj rov qab mus rau daim nplaub tshev uas koj tau qhib yav tas los, thaum "Forward" xub tuav (xub xub tig mus rau tom ntej) yuav qhib lub nplaub tshev tom ntej uas tau qhib.
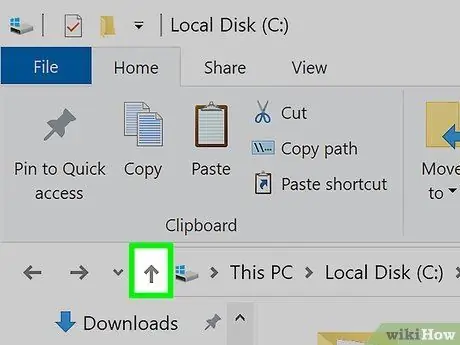
Kauj Ruam 3. Nyem rau Up khawm khawm (tig-tig xub xub) kom hloov pauv nplaub tshev qib (rau Windows 10)
Koj yuav pom lub pob no nyob ib sab ntawm Back and Forward xub tuav. Nyem rau lub pob no yuav qhib ib daim nplaub tshev saum toj ib qho uas koj tab tom qhib tam sim no. Piv txwv li, yog tias koj nyob hauv "C: / Program Files / Adobe" nplaub tshev, nyem lub pob Up khawm yuav qhib "C: / Program Files".
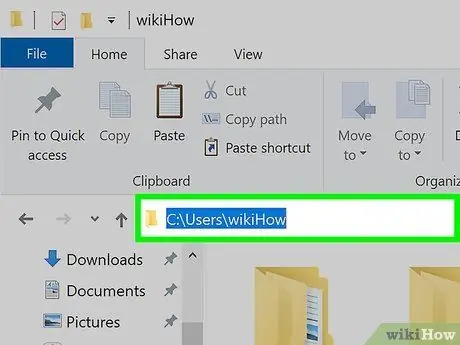
Kauj Ruam 4. Nyem qhov chaw nyob kom pom qhov chaw ntawm daim nplaub tshev uas koj tab tom qhib tam sim no
Yog tias koj xav paub qhov chaw tshwj xeeb rau daim ntawv qhib tam sim no, nyem qhov chaw khoob hauv qhov chaw nyob. Tom qab ntawd, qhov chaw tshwj xeeb ntawm daim nplaub tshev yuav raug hais qhia thiab koj tuaj yeem luam qhov chaw.
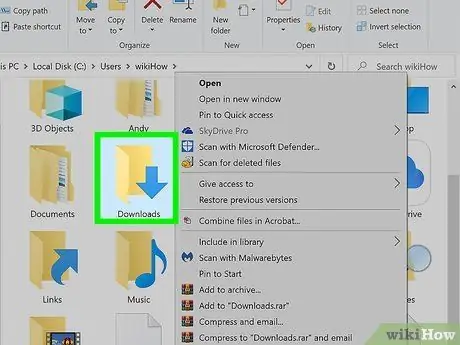
Kauj Ruam 5. Right-click daim nplaub tshev kom pom ntau txoj hauv kev
Thaum txoj nyem rau ntawm daim nplaub tshev, cov ntawv qhia zaub mov nco-down yuav tshwm ntawm qhov screen. Cov ntawv qhia zaub mov no muaj ntau txoj kev xaiv sib txawv thiab txhim kho qhov program yuav ntxiv cov kev xaiv tshiab.
- Xaiv qhov "Qhib hauv lub qhov rai tshiab" xaiv qhib koj cov ntawv xaiv hauv ib lub qhov rai cais. Qhov no tuaj yeem pab koj txav cov ntawv thiab cov ntawv nrawm.
- Xaiv qhov "Pin to taskbar" kev xaiv txhawm rau nquag siv cov ntawv tais ceev tseg ntawm Windows taskbar yog li koj tuaj yeem qhib lawv yooj yim thiab nrawm.
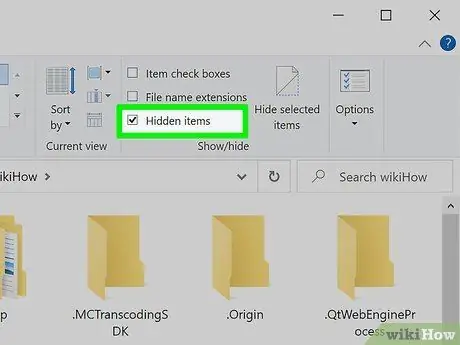
Kauj Ruam 6. Qhia cov ntaub ntawv zais
Yog tias koj xav pom cov ntaub ntawv zais, koj yuav tsum tau zais lawv ua ntej. Ua raws cov theem no txhawm rau saib cov ntawv:
- Rau Windows 10 thiab Windows 8 - Nyem rau View tab thaum qhib txhua daim nplaub tshev. Tom qab ntawd, khij lub npov "Cov khoom zais".
- Rau Windows 7 - Nyem rau Organize khawm thiab xaiv qhov kev xaiv "Folder and search options." Tom qab ntawd, nyem rau "Saib" tab hauv lub qhov rai uas tshwm ntawm qhov screen thiab pab kom "Qhia cov ntaub ntawv zais, cov ntawv tais ceev tseg, thiab tsav".
Txoj Kev 3 ntawm 4: Nrhiav Cov Ntaub Ntawv
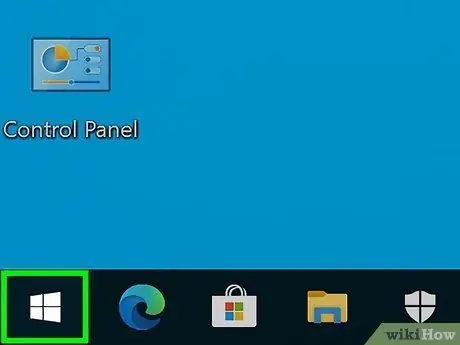
Kauj Ruam 1. Nyem rau Start button
Koj tuaj yeem tshawb nrhiav cov ntaub ntawv ntawm Start menu.
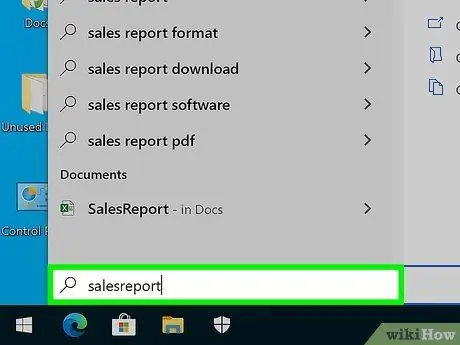
Kauj Ruam 2. Ntaus lub npe ntawv lossis lub npe uas koj xav tshawb
Koj tseem tuaj yeem ntaus cov ntawv txuas ntxiv txhawm rau nrhiav cov ntaub ntawv hauv qhov txuas ntxiv ntawd, xws li "docx" txuas ntxiv rau Microsoft Word cov ntaub ntawv.
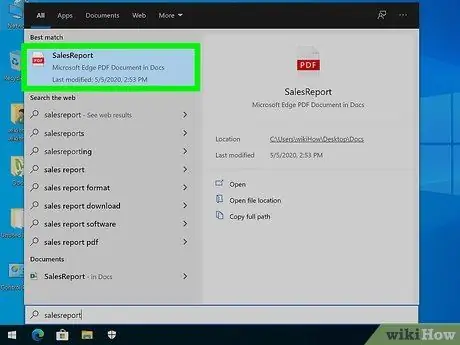
Kauj Ruam 3. Nyem qhov tshawb nrhiav kom qhib nws
Yog tias koj tab tom nrhiav cov ntaub ntawv, nyem rau ntawm cov ntaub ntawv uas tshwm hauv qhov kev tshawb fawb yuav qhib nws hauv qhov program uas koj tau siv los qhib cov ntawv. Yog tias koj tab tom nrhiav rau daim nplaub tshev, nyem rau daim nplaub tshev uas tshwm hauv qhov kev tshawb fawb yuav qhib nws hauv lub qhov rai File Explorer tshiab. Yog tias koj tab tom nrhiav ib txoj haujlwm, nyem rau ntawm qhov program uas tshwm hauv qhov kev tshawb fawb yuav ua haujlwm.
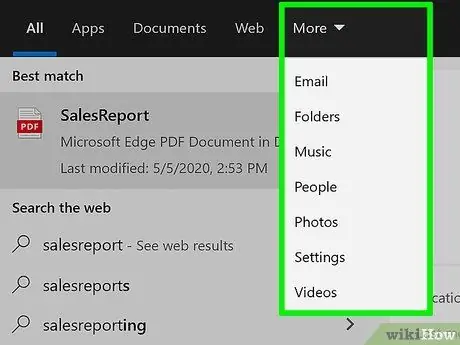
Kauj Ruam 4. Nyem rau qeb tshawb fawb los tso saib tag nrho cov txiaj ntsig tshawb fawb uas yog rau pawg ntawd
Piv txwv li, yog Windows qhia ntau cov ntaub ntawv uas muaj lo lus tshawb nrhiav, nyem rau Cov Ntawv Pawg yuav qhia tag nrho cov txiaj ntsig tshawb fawb hauv daim ntawv.
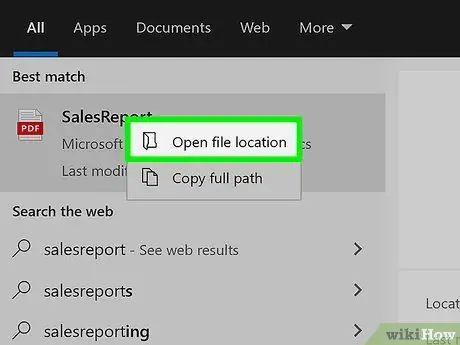
Kauj Ruam 5. Right-click qhov kev tshawb fawb thiab xaiv Qhib cov ntaub ntawv qhov chaw xaiv
Qhov no yuav qhib lub nplaub tshev uas muaj cov ntawv hauv lub qhov rai tshiab.
Txoj Kev 4 ntawm 4: Siv Command Prompt
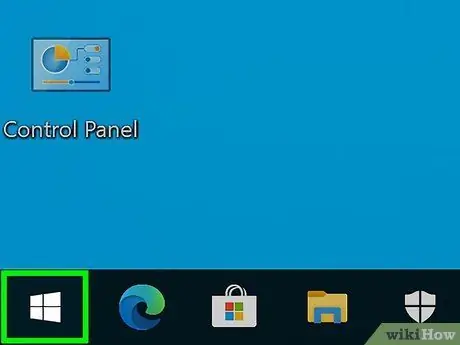
Kauj Ruam 1. Nyem rau Start button
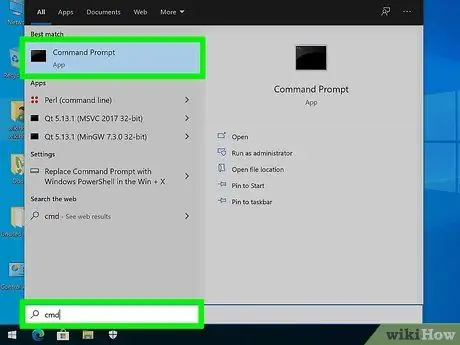
Kauj Ruam 2. Ntaus cmd thiab nias Enter
Qhov no yuav qhib Command Prompt.
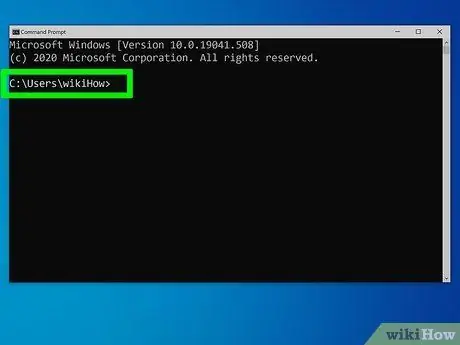
Kauj Ruam 3. Nrhiav seb cov ntawv twg tau qhib los ntawm lub hauv paus los ntawm Command Prompt
Thaum khiav Command Prompt, koj cov neeg siv nplaub tshev lossis tus neeg siv ntawv yuav raug qhib los ntawm lub neej ntawd.
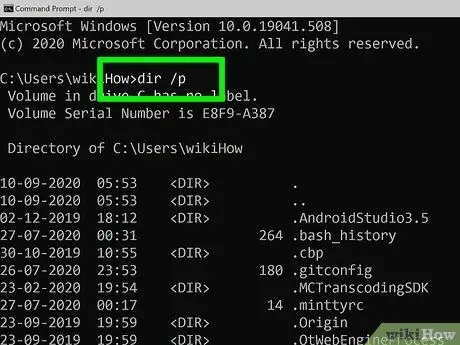
Kauj Ruam 4. Ntaus dir /p thiab nias Enter
Qhov no yuav tso tawm cov ntsiab lus ntawm cov ntawv qhib tam sim no. Qhov screen Command Prompt yuav nres nqes mus thaum lub vijtsam puv nrog cov ntaub ntawv hais txog cov ntsiab lus ntawm daim nplaub tshev. Koj tuaj yeem nias tus yuam sij twg los txuas ntxiv mus.
- Tus chij qhia lub nplaub tshev uas khaws cia hauv phau ntawv uas koj tab tom qhib tam sim no hauv Command Prompt.
- Cov ntaub ntawv loj yuav tshwm nyob rau hauv "bytes" (bytes) thiab nyob ib sab ntawm cov npe ntawv.
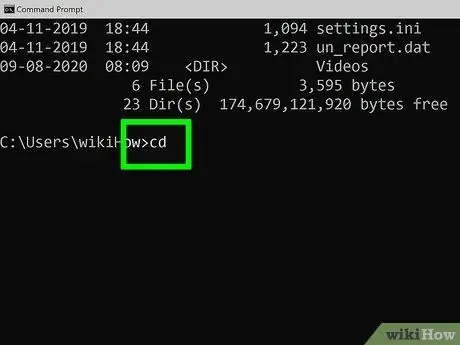
Kauj Ruam 5. Ntaus cd
. thiab nias Enter qhov tseem ceeb.
Qhov no yuav qhib daim nplaub tshev uas nyob saum cov npe uas koj tab tom qhib tam sim no.
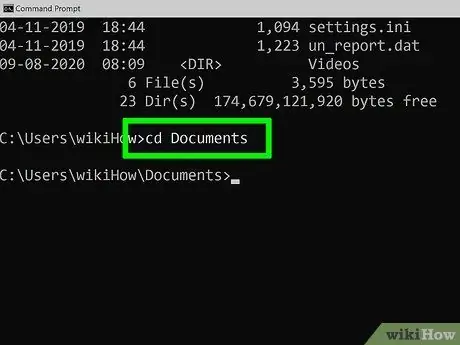
Kauj Ruam 6. Ntaus cd lub npe kom qhib lub nplaub tshev uas khaws hauv phau ntawv teev npe
Piv txwv li, yog tias koj tab tom qhib Cov Neeg Siv cov ntawv, koj tuaj yeem ntaus cov ntaub ntawv cd thiab nias Enter kom qhib Cov Ntawv Teev Npe.
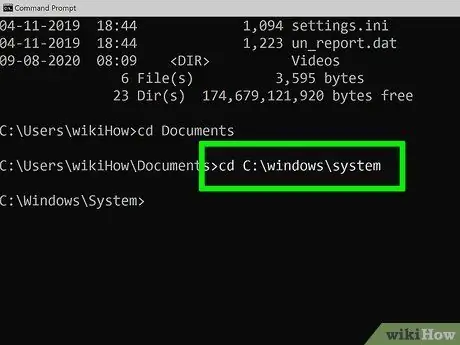
Kauj Ruam 7. Ntaus hauv kab CD kom qhib qhov chaw tshwj xeeb
Piv txwv li, qhib Microsoft Office 15 nplaub tshev uas tau muab khaws cia rau hauv Cov Ntaub Ntawv Cov Ntaub Ntawv, koj yuav ntaus cd C: / Program Files Microsoft Office 15.
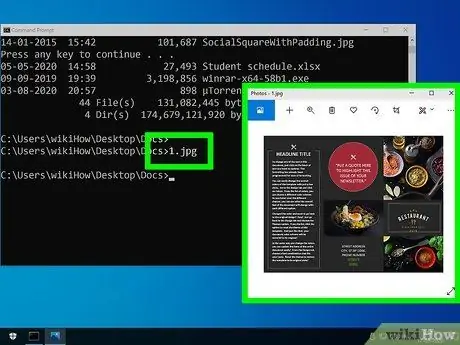
Kauj Ruam 8. Ntaus lub npe ntawv thiab nias Enter kom qhib nws
Qhov no yuav qhib cov ntawv hauv qhov program tsis raug. Txhawm rau qhib cov ntawv, koj yuav tsum ntaus nws lub npe tag nrho nrog rau daim ntawv txuas ntxiv.


